持续更新中—
一、定义:以下均使用括号中的简称
工作区:workspace (W)
暂存区:index (I)
本地仓库:local repository (L)
远程仓库:remote repository (R)
二、常用命令:
git init
2.常用配置信息
(如果不使用–global,则只设置当前项目的配置信息)
查看.gitconfig文件在哪里:
git config –list –show-origin
直接改全局代理文件:
git config –global –edit
设置代理:
git config –global http.proxy http://xxx.com:port
取消代理:
git config –global –unset http.proxy
设置用户名:
git config –global user.name “[name]”
设置邮箱:
git config –global user.email “”
设置命令行颜色:
git config –global color.ui auto
查看用户名:
git config –global user.name
配置crlf:
git config –global core.autocrlf [true/false/input]
(在windows下设置为true,则提交的内容是LF,本地是CRLF)
配置文件名大小写敏感:(git默认不区分文件名大小写)
(可以新增文件,但是之前文件还没有删除) git config core.ignorecase false
(可以尝试) git mv –force myfile myFile
3.添加–从工作区W到暂存区I
添加单个文件/多个文件/目录:
git add [file1] [file2] [directory]
添加新增和修改的文件,不做删除操作:
git add .
添加修改和删除的文件,不做新增操作:
git add -u
添加增删改的文件:等于git add .;git add -u;
git add -A
4.提交:
(1)从暂存区I到本地仓库L
git commit -m [提交信息]
(2)
5.撤销
(1)从暂存区I到工作区W
git rm –cached <file> …
(2)恢复到HEAD版本
git reset –hard HEAD
(3)修改提交的用户名信息
git commit –amend –author=”Author Name <email@address.com>”
6.远程
(1)更改远程仓库地址
git remote set-url origin http://xxx.xx.com/x.git
(2)查看远程仓库地址
git remote show origin
(2)查看远程仓库日志
git log origin/master
(3)比较本地分支和远程分支
git diff master origin/master
(4)查看远程分支
git branch -r
(5)拉取远程
方法1:拉取并合并
git pull
方法2:先拉取后合并
git fetch origin
git merge origin/master
(6)查看本地分支和远程分支的差异
git diff master origin/master
(7)基于远程分支创建本地分支
git checkout -b feature origin/feature
7.分支
查看分支:git branch
查看远程分支的本地copies:git branch -r
查看远程分支: git ls-remote
查看所有分支: git branch -a
创建分支:git branch <name> <origin/name>
切换分支:git checkout <name>
创建+切换分支:git checkout -b <name> <origin/name>
合并某分支到当前分支:git merge <name>
删除分支:git branch -d <name>
删除远程分支: git push origin –delete <name>
获取远程分支: git fetch
更新远程分支的本地copies: git fetch –prune origin
删除不存在的远程分支的信息:git remote prune origin
8.储藏
保存:git stash
查看stash列表:git stash list
恢复:git stash apply
恢复特定版本:git stash apply stash@{2}
清除某个stash记录:git stash drop stash@{0}
9.引用
(1)查看提交的哈希字串
git log
git log –pretty=oneline
git log –pretty=format:“%an %h %s” // 作者/hash/commit message
查看历史中有xxx的
git log -G”删除掉的内容” -p
git log -S“删除掉的内容” -p
git log –grep “删除掉的内容”
git log -p | grep “删除掉的内容”
查看某个目录(eg: txv)的提交记录
git log — txv
git log -p — txv (有详细的内容)
(2)查看某个提交
git show 0c708f(哈希)
(3)查看分支、标签或间接引用的哈希
git rev-parse master
(4)查看引用
在.git/refs目录下
git show refs/heads/some-feature
在.git目录下还有一些引用:
HEAD – 当前所在的提交或分支。
FETCH_HEAD – 远程仓库中fetch到的最新一次提交。
ORIG_HEAD – HEAD的备份引用,避免损坏。
MERGE_HEAD – 你通过git merge并入当前分支的引用(们)。
CHERRY_PICK_HEAD – 你cherry pick使用的引用。
(5)refspec
refspec的定义是这样的:[+]<src>:<dst>。<src>参数是本地的源分支,<dst>是远程的目标分支。可选的+号强制远程仓库采用非快速向前的更新策略。
(6)相对引用
git show HEAD~2 祖父节点
git show HEAD^2 第二个父节点(分支合并时,原所在分支是第一个父节点)
git show HEAD^2^1 可以多层
(7)引用日志
git reflog
git checkout HEAD@{1}
10.代码回滚
reset checkout revert的选择
reset checkout 可以指定文件或某次提交,revert只针对提交,不针对文件
checkout revert 有可能会重写文件,在使用前要提交或缓存工作目录的修改
(1)reset(仅仅用在私有分支上,一般只用HEAD)
git checkout feature
git reset HEAD (末端两个提交变成悬挂提交,git垃圾回收时会被删除)
git reset –hard HEAD
–soft – 缓存区和工作目录都不会被改变
–mixed – 默认选项。缓存区和你指定的提交同步,但工作目录不受影响
–hard – 缓存区和工作目录都同步到你指定的提交
git reset HEAD file1.js 将HEAD提交中的该文件加入到缓存区,针对文件没有–mixed之类的参数,相当于撤销 git add 操作(验证过这个作用)
(2)checkout
git checkout feature 切换分支
git checkout HEAD~2 把HEAD移动到特定提交,但会造成HEAD分离,非常危险,如果你接着添加新的提交,然后切换到别的分支之后就没办法回到之前添加的这些提交。因此,在为分离的HEAD添加新的提交的时候你应该创建一个新的分支。
git checkout HEAD~2 file1.js 将工作目录的该文件同步到HEAD~2
(和git reset HEAD –hard很像,但只影响特定文件)
(3)revert(可以用在公共分支,不会影响历史,创建一个新的提交来撤销某个提交的修改)
git checkout feature
git revert HEAD~2
revert多个提交生成多个commit:git revert old-commitId^..new-commitId
如果我们想把这三个revert不自动生成三个新的commit,而是用一个commit完成,可以这样:git revert -n old-commitId^..new-commitId
然后确认无误后,执行git revert –continue
11.打标签
(1)查看当前标签
git tag
(2)打标签
git tag -a v1.0.0 -m “my version v1.0.0”
(3)查看某个tag
git show v1.0.0
(4)删除某个tag
git tag -d v1.0.0
(4)把tag推送到远程
git push origin –tags
12.比较
git diff 工作区(W)跟暂存区(I)的区别(使用 f 翻下一页,使用b 翻上一页)
git diff HEAD 工作区(W)跟本地仓库(L)的区别
git diff –staged 暂存区(I)跟本地仓库(L)的区别
(后边跟上文件名则只对比某个文件)
提交前比较某个文件
git diff — myfile.js 工作区(W)跟暂存区(I)的区别
git diff HEAD — myfile.js 工作区(W)跟本地仓库(L)的区别
git diff –cached myfile.js 暂存区(I)与本地仓库(L)的区别
比较时忽略空格变化
git diff -w (–ignore-all-space)
使用图形化工具查看比较
gitk &
设置图形化工具的编码
git config –global gui.encoding utf-8
13.打包
git archive –format zip –output /path/to/file.zip master
14.分支的衍合
(1)分支rebase
git checkout feature
git rebase master
解决冲突后 git add .
git rebase –continue
(2)合并多个提交:
git rebase -i [startpoint] [endpoint]
git rebase -i HEAD~3
https://juejin.im/entry/5ae9706d51882567327809d0
https://www.liaoxuefeng.com/wiki/896043488029600/1216289527823648
eg:如果要把最近两次提交合并则:
git rebase -i HEAD~2
将除第一行的pick外的改成s或者squash
:wq保存
删掉commit msg 只留下一个commit msg
:wq 保存
git push -f // 强制push到远端
(3)减少merge次数
git pull –rebase
当远端分支有其他人的提交时,本地执行git pull通常会生成一个merge节点。可以使用git pull –rebase来避免这类merge节点
15.只合并某个提交或者某个文件
git cherry-pick <commit id> 合并某一个提交
git cherry-pick -x <commit id> 合并某一个提交,并保留原提交的信息
git cherry-pick <start commit id>..<end commit id> 合并某个区间的提交,左开右闭
git cherry-pick <start commit id>^..<end commit id> 合并某个区间的提交,闭区间
git checkout branchname — <paths>
git merge –no-ff –no-commit branchname (不快速向前,不提交)
16.git 免重复登录方式
git本身支持SSH方式,在此不具体介绍了。
git支持credential的方式,在win7下可以设置credential helper为wincred,可以在”控制面板”–“用户账户”–“凭据管理器” 里查看凭据。在mac可以设置osxkeychain,可以在keychain access钥匙串工具里的login凭据里查看。
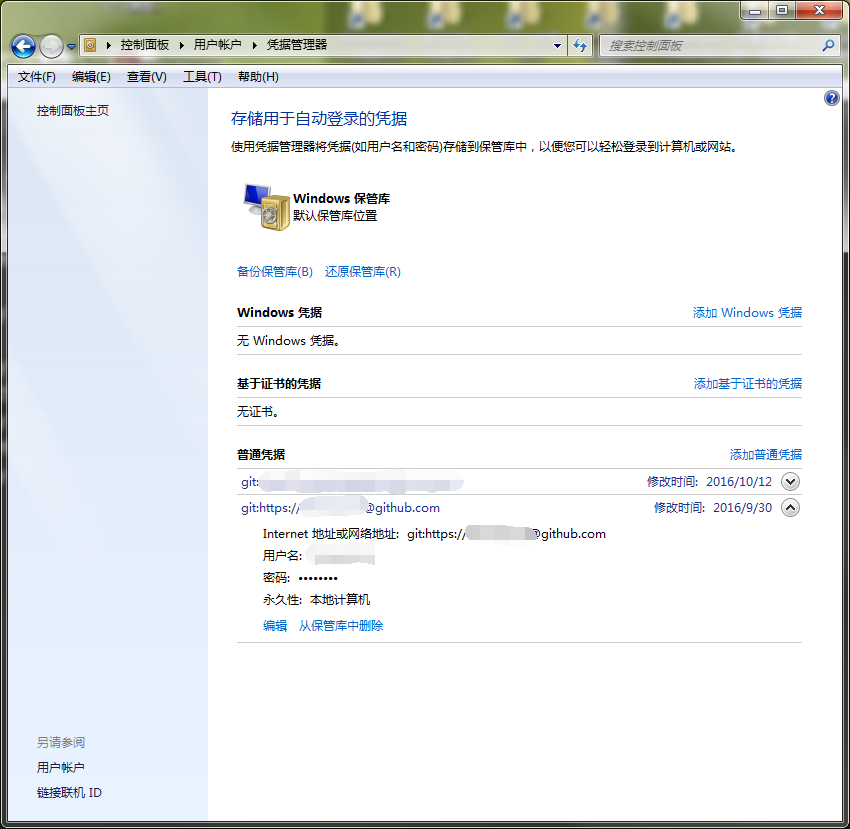
设置和取消凭证管理的方式:
git config –global –unset credential.helper
git config –global credential.helper wincred
17.git 设置命令别名
git config –global alias.co checkout
git config –global alias.ci commit
git config –global alias.br branch
git config –global alias.lg “log –color –gragh –pretty=format:’%Cred%h%Creset -%C(yellow)%d%Creset %s %Cgreen(%cr) %C(blod blue)<%an>%Creset’ –abbrev-commit”
参考地址:http://blog.csdn.net/zhang31jian/article/details/41011313
18.git 判断代码最初是由谁提交的
git blame <filename>
git blame -L 100,100 <filenname>
git blame -L 100,+10 <filename>
19.冲突解决
(1)merge之后冲突,如果保留当前版本用–ours,如果保留合并版本用–theirs
eg: git checkout –theirs webpack.config.js
(2)取消合并
git merge –abort
(3)强制branchA与branchB完全一样
git checkout branchA
git reset –hard branchB
git push -f origin branchA
20.fork项目以后如何同步源项目的更新内容
git remote -v //查看远程状态
git remote add upstream https://github.com/ORIGINAL_OWNER/ORIGINAL_REPOSITORY.git //确定一个将被同步给 fork 远程的上游仓库
git remote -v //查看状态确认是否配置成功
git fetch upstream //更新本地upsteam/master
git checkout master
git merge upstream/master
git push origin master
21.git bisect
是一个很有用的命令,用来查找哪一次代码提交引入了错误 http://www.ruanyifeng.com/blog/2018/12/git-bisect.html
git log –pretty=oneline // 查看日志
git bisect start HEAD 4d83cf // [终点] [起点]
git bisect good // 这个commit的时候是正常的
git bisect bad // 这个commit的时候是不正常的
git bisect reset // 退出查错
22.git submodule vs subtree
git submodule类似于引用,而git subtree类似于拷贝
https://www.xianmin.org/post/git-submodule/
| submodule | subtree | |
| 修改代码并提交 | 默认在detached HEAD,需要先切换分支,push跟正常git一样 | push会比较慢 |
| 更新到最新版本 | 需要递归更新git submodule foreach git submodule update | 所有子模块单独更新 |
| 远程仓库空间占用 | 只是引用,基本不占什么地方,只有.gitmodules和一个目录文件 | 子模块copy,会占用较大的额外空间 |
| 本地占用空间 | 需要详细文件 | 需要详细文件 |
| 仓库clone | 除了clone还需要init和更新,稍微复杂 | clone后即可使用,简单一下 |
submodule官方文档 https://git-scm.com/book/zh/v2/Git-%E5%B7%A5%E5%85%B7-%E5%AD%90%E6%A8%A1%E5%9D%97
submodule的坑 https://blog.devtang.com/2013/05/08/git-submodule-issues/
(1)添加子模块到指定路径:git submodule add https://github.com/chaconinc/DbConnector <本地目录名eg: DbConnector>
(2)虽然 DbConnector 是工作目录中的一个子目录,但 Git 还是会将它视作一个子模块。当你不在那个目录中时,Git 并不会跟踪它的内容, 而是将它看作子模块仓库中的某个具体的提交。
看更漂亮的差异输出: git diff --cached --submodule
(3)克隆含有子模块的项目
方法1:
git clone https://github.com/chaconinc/MainProject
git submodule init 初始化本地配置文件
git submodule update 从该项目中抓取所有数据并检出父项目中列出的合适的提交
备注: git submodule update –init 可以将将git submodule init 和 git submodule update 合并成一步,
如果还要初始化、抓取并检出任何嵌套的子模块, 请使用简明的 git submodule update --init --recursive
方法2:
git clone --recurse-submodules https://github.com/chaconinc/MainProject
(4)从子模块的远端拉取上游修改(更新主项目对子模块的引用情况)
cd DbConnector
git fetch
git merge origin/master
如果你现在返回到主项目并运行 git diff --submodule,就会看到子模块被更新的同时获得了一个包含新添加提交的列表。 如果你不想每次运行 git diff 时都输入 --submodle,那么可以将 diff.submodule 设置为 “log” 来将其作为默认行为。
git config --global diff.submodule log
git diff
如果你不想在子目录中手动抓取与合并,那么还有种更容易的方式。 运行 git submodule update --remote,Git 将会进入子模块然后抓取并更新。
(5)使用子模块的指定分支
git config -f .gitmodules submodule.DbConnector.branch stable
如果不用 -f .gitmodules 选项,那么它只会为你做修改。但是在仓库中保留跟踪信息更有意义一些,因为其他人也可以得到同样的效果。
如果你设置了配置选项 status.submodulesummary(git config status.submodulesummary 1),Git 也会显示你的子模块的更改摘要(git status的时候)
查看日志 git log -p --submodule
(6) 从MainProject项目远端拉取上游更改
默认情况下,git pull 命令会递归地抓取子模块的更改,如上面第一个命令的输出所示。 然而,它不会 更新 子模块,可以使用git submodule update --init --recursive
如果你想自动化此过程,那么可以为 git pull 命令添加 --recurse-submodules 选项(从 Git 2.14 开始)。 这会让 Git 在拉取后运行 git submodule update,将子模块置为正确的状态。 此外,如果你想让 Git 总是以 --recurse-submodules 拉取,可以将配置选项 submodule.recurse 设置为 true (从 Git 2.15 开始可用于 git pull)。此选项会让 Git 为所有支持 --recurse-submodules 的命令使用该选项(除 clone 以外)。
在为父级项目拉取更新时,还会出现一种特殊的情况:在你拉取的提交中, 可能 .gitmodules 文件中记录的子模块的 URL 发生了改变。 比如,若子模块项目改变了它的托管平台,就会发生这种情况。 此时,若父级项目引用的子模块提交不在仓库中本地配置的子模块远端上,那么执行 git pull --recurse-submodules 或 git submodule update 就会失败。 为了补救,git submodule sync 命令需要:
# 将新的 URL 复制到本地配置中
$ git submodule sync --recursive
# 从新 URL 更新子模块
$ git submodule update --init --recursive
(7) 修改子模块
cd DbConnector
git checkout stable // 选择分支,避免使用游离的HEAD
cd ..
git submodule update –remote –merge
cd DbConnector
vim src/db.c
git commit -am ‘unicode support’
cd ..
git submodule update –remote –rebase
(8) 发布子模块的改动
现在我们的子模块目录中有一些改动。 其中有一些是我们通过更新从上游引入的,而另一些是本地生成的,由于我们还没有推送它们,所以对任何其他人都不可用。
可以让 Git 在推送到主项目前检查所有子模块是否已推送。 git push 命令接受可以设置为 “check” 或 “on-demand” 的 --recurse-submodules 参数。
如果任何提交的子模块改动没有推送那么 “check” 选项会直接使 push 操作失败:git push --recurse-submodules=check , 可以通过设置 git config push.recurseSubmodules check 让它成为默认行为。
如果任何提交的子模块改动没有推送那么 “on-demand” 选项会直接帮你先push子模块: git push --recurse-submodules=on-demand 可以通过设置 git config push.recurseSubmodules on-demand 让它成为默认行为。
(9)合并子模块改动
有冲突的时候使用, 貌似比较复杂
(10)子模的块技巧
子模块遍历
git submodule foreach 'git stash'
git submodule foreach 'git checkout -b featureA'
有用的别名
$ git config alias.sdiff '!'"git diff && git submodule foreach 'git diff'"
$ git config alias.spush 'push --recurse-submodules=on-demand'
$ git config alias.supdate 'submodule update --remote --merge'
23.将子文件夹拆分成新仓库
我理解是一次性的拆分,能保留该子文件夹的提交记录保留下来,之后就各自维护了吧(使用场景不多)
https://stackoverflow.com/questions/7430717/git-filter-branch-on-all-branches
三、常用场景:
1.创建新的库
mkdir tutorial
cd tutorial
git init
touch README.md
git add README.md
git commit -m “first commit”
git remote add origin http://xxx.xx.com/x.git
git push -u origin master
2.push已经存在的库
cd existing_repo
git remote add origin http://xxx.xx.com/x.git
git push -u origin master
3.merge request
git fetch origin
git checkout -b request-branch origin/request-branch
git checkout master
git merge –no-ff request-branch
git push origin master
默认情况下,Git执行”快进式合并”(fast-farward merge),会直接将Master分支指向Develop分支。
使用–no-ff参数后,会执行正常合并,在Master分支上生成一个新节点。为了保证版本演进的清晰,我们希望采用这种做法。
4.github quick setup
(1)https://github.com/username/gittest.git
git@github.com:username/gittest.git
(2)create a new repository on the command line:
echo “# gittest” >> README.md
git init
git add REAME.md
git commit -m “first commit”
git remote add origin git@github.com:username/gittest.git
git push -u origin master
(3)push an existing repository from the command line
git remote add origin git@github.com:username/gittest.git
git push -u origin master
(4)import code from another repository
You can initialize the repository with code from a Subversion,Mercurial, or TFS project.
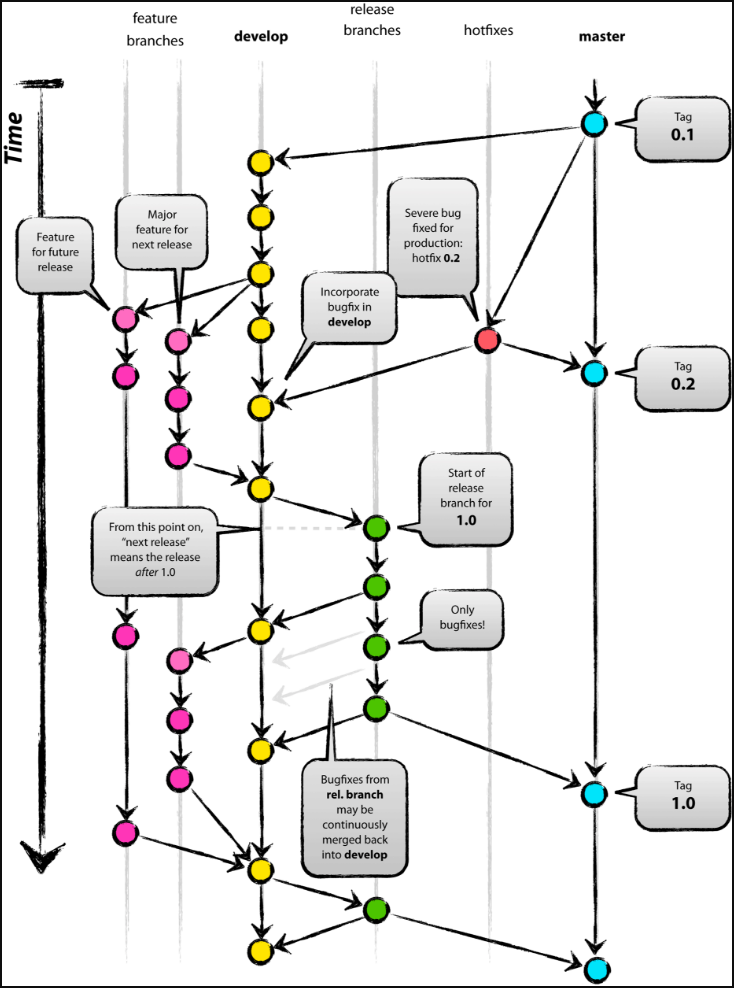
5.gitflow
参考链接:http://www.cnblogs.com/cnblogsfans/p/5075073.html
可以使用GUI工具SourceTree(http://blog.csdn.net/victor_barnett/article/details/51211282)
git flow init之后,配置文件和hooks分别在.git/config .git/hooks/
初始化: git flow init
开始新Feature: git flow feature start MYFEATURE
Publish一个Feature(也就是push到远程): git flow feature publish MYFEATURE
获取Publish的Feature: git flow feature pull origin MYFEATURE
完成一个Feature: git flow feature finish MYFEATURE
开始一个Release: git flow release start RELEASE [BASE]
Publish一个Release: git flow release publish RELEASE
发布Release: git flow release finish RELEASE
别忘了git push –tags
开始一个Hotfix: git flow hotfix start VERSION [BASENAME]
发布一个Hotfix: git flow hotfix finish VERSION

发表回复